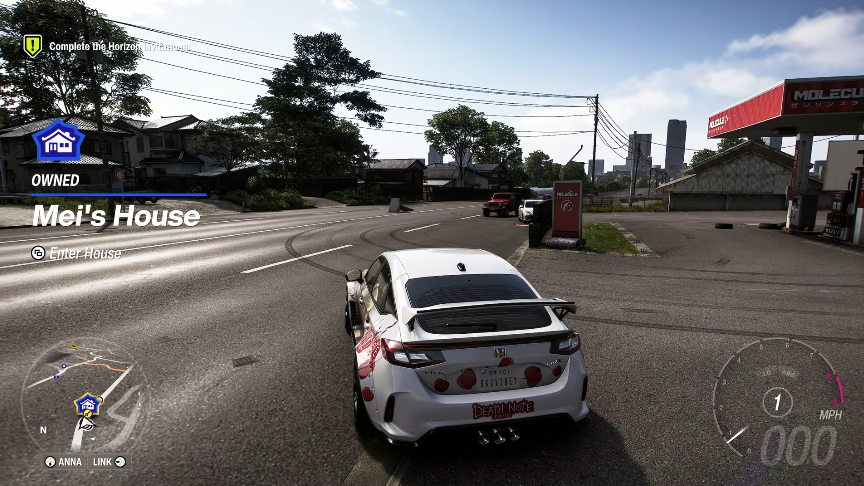
Forza Horizon 6 already delivers impressive visual fidelity straight out of the box, but for players seeking to push the game’s graphical presentation even further, ReShade offers a powerful post-processing solution. This third-party tool allows you to apply custom shaders and effects such as color correction, sharpening, ambient lighting adjustments, and lens flare modifications, fundamentally altering the game’s visual tone to match personal preference. In this guide, we will walk through the complete installation process for ReShade 6.7.3 on Forza Horizon 6 (Steam version), including where to download preset configuration files from Nexus Mods, how to properly place the .ini file in your game directory, how to run the ReShade setup executable with the correct rendering API (DirectX 10/11/12), and finally how to configure the in-game overlay—including disabling problematic effects like bloom and film grain—to achieve a cleaner, more vibrant image without sacrificing performance or stability.
What is ReShade and Why Use It?
ReShade is a generic post-processing injector for Windows games. It allows you to apply advanced color correction, ambient lighting, depth-of-field effects, sharpening filters, and many other visual modifications without altering the game’s original files. For Forza Horizon 6, which already features strong native visuals, ReShade can enhance contrast, increase vibrancy, reduce excessive brightness, or add cinematic tones depending on the preset you choose.
It is important to note that ReShade is entirely optional and a matter of personal preference. Some players prefer the vanilla look, while others enjoy the flexibility of tuning every visual parameter.
Prerequisites
Before beginning the installation process, ensure you have completed the following steps:
- Forza Horizon 6 installed on Steam.
- The game launched at least once. This ensures that all necessary configuration files and registry entries are created.
- A Nexus Mods account (free). You will need this to download preset files.
- Administrative rights on your Windows PC (recommended for installing ReShade into protected folders like Program Files).
Step 1: Download the ReShade Setup Tool
The first step is to download the official ReShade installer from the developer’s website.

- Open your web browser and navigate to
reshade.me - Click the Download button on the main page.
- Scroll down and click Download ReShade 6.7.3 (or the latest version available at the time of reading).
- Save the setup file to your Downloads folder.
Do not run the setup file yet. You will need additional files before proceeding.
Step 2: Download a ReShade Preset from Nexus Mods
A preset is a pre-configured collection of effects and their intensity settings. Instead of manually selecting dozens of shaders, you can download a preset created by another player and apply it instantly.
- Navigate to
nexusmods.comin your browser. - Create an account or log in if you already have one. This is required to download any file.
- Use the search bar to find Forza Horizon 6.
- Click on the game tile to enter its dedicated mod page.
- In the search bar within the Forza Horizon 6 section, type ReShade and press Enter.
- Browse through the available presets. At the time of the original guide, there were approximately 12 ReShade presets for Forza Horizon 6.
- Select a preset that matches your visual preference. Examples include:
- Hyperrealistic ReShade (darker, more contrast)
- Vibrant ReShade (saturated colors)
- Cinematic ReShade (film-like grain and color grading)
- Once you have chosen a preset, click on its title, go to the Files tab, and click Manual Download on the main file.
- Confirm the download with Slow Download (free account) or any available option.
Save the downloaded archive (usually a .zip or .rar file) to your Downloads folder.
Step 3: Extract the Preset Files
The downloaded file contains at least one .ini configuration file and often a readme .txt file. You need to extract the .ini file.
- Navigate to your Downloads folder.
- Right-click the downloaded archive (e.g.,
hyperrealistic_reshade.zip). - Select Extract All (Windows native) or use third-party software such as WinRAR, 7-Zip, or WinZip.
- Choose a destination folder (the default location is fine) and click Extract.
- Open the extracted folder. You should see at least two files:
- A
.txtfile (instructions, not needed for the installation) - An
.inifile (this is the actual ReShade preset configuration)
- A
The .ini file is the only file you need for the next step.
Step 4: Copy the .ini File to Your Forza Horizon 6 Game Directory
To ensure ReShade can find your preset and to prevent accidental deletion of the .ini file, you should copy it directly into the game’s main folder.
- Open your Steam Library.
- Right-click on Forza Horizon 6.
- Select Manage → Browse Local Files. This opens the game’s installation directory.
- In this folder, you should see the
ForzaHorizon6.exefile (or similar executable name). - Drag the
.inifile you extracted from Step 3 into this folder.
Why this is important: If you leave the .ini file inside the extracted archive or a temporary folder, deleting that folder later will cause ReShade to stop working. Placing the .ini file inside the game directory ensures it persists even if you uninstall the game, as modded configuration files typically remain after uninstallation.
If you prefer not to move the .ini file, you can leave it elsewhere, but you will need to point ReShade to its location during setup (covered in Step 6) and ensure the file is never deleted.
Step 5: Run the ReShade Setup and Select the Game Executable
Now you are ready to run the ReShade installer.
- Double-click the
ReShade_Setup_6.7.3.exefile you downloaded in Step 1. - The setup window will open. You need to select the Forza Horizon 6 executable. There are three ways to do this:
- Scroll through the list to find
Forza Horizon 6.exe. - Type “Forza” in the search bar and select it from the results.
- Click Browse, then navigate manually to the game folder (typically
C:\Program Files (x86)\Steam\steamapps\common\Forza Horizon 6\) and select the.exefile.
- Scroll through the list to find
- Once the correct executable is selected, click Next.
Step 6: Select the Correct Rendering API
Most modern games, including Forza Horizon 6, use DirectX 10, 11, or 12. ReShade needs to know which graphics API the game uses.
- On the rendering API selection screen, choose DirectX 10/11/12.
- Click Next.
If you are prompted to update ReShade and effects (because a previous installation exists), you can click Update ReShade and effects to proceed. New users will not see this screen and will move directly to the effect selection step.
Step 7: Load the Preset .ini File and Install Effects
This step tells ReShade which preset configuration to use and automatically selects all the required shader effects.
- After selecting the rendering API, ReShade will present a list of effects (shaders). Do not manually check any boxes yet.
- Click the Browse button near the top of the window.
- A file browser window will open. Navigate to your Forza Horizon 6 game directory (the same folder containing the
.exefile). - Locate the
.inipreset file you copied in Step 4 (e.g.,Forza Horizon 6 hyperrealistic.ini). - Select the
.inifile and click Open. - ReShade will automatically scan the preset and select all the effects required for that configuration.
- Click Next.
ReShade will now download and install the required shader effects. This may take a few seconds depending on your internet connection.
Step 8: Launch Forza Horizon 6 and Verify ReShade is Active
After the installation completes, you can launch the game to confirm ReShade is working.
- Start Forza Horizon 6 through Steam.
- Upon loading into the game world or even during the main menu, look for a text message at the top of the screen indicating that ReShade has been loaded. This message appears briefly and may disappear quickly.
- Press the Home key on your keyboard. This opens the ReShade in-game overlay.
- If the overlay appears, ReShade is successfully installed.
Step 9: Configure the In-Game ReShade Menu
The default settings of a preset may not match your preferences. The original guide recommends adjusting two specific settings to reduce excessive brightness and glow.
Set a Toggle Key
It is useful to assign a key that enables or disables ReShade effects instantly, allowing you to compare the modded look with the vanilla look.
- Press Home to open the ReShade overlay.
- Click Skip Tutorial if prompted.
- Click on the Settings tab.
- Locate Effect Toggle Key. Click the field and then press the key you want to assign (for example, the End key).
- Click anywhere outside the field to save the binding.
You can now press that key at any time to toggle all effects on and off.
Disable Bloom and Film Deck (Based on User Feedback)
The hyperrealistic preset mentioned in the original guide includes effects that may cause excessive screen glow, bright lens flares, and unnatural color casts. To achieve a cleaner image, disable the following effects:
- In the ReShade overlay, go to the Home tab.
- Scroll through the list of active effects.
- Uncheck the boxes for:
- Bloom (creates intense light bleeding)
- Bloom Lens Flare (adds artificial light streaks)
- Film Deck (adds film grain and color shift)
- Leave other effects such as sharpening, color correction, and ambient lighting enabled.
The result, as described in the original guide, is a game that “pops” with improved contrast and vibrancy without the distracting glow that makes menu text difficult to read.
Optional Adjustments
You can further fine-tune your visuals by exploring other effect toggles, including:
- LightRoom – modifies exposure, contrast, and saturation globally.
- Sharpening – enhances texture detail, especially on vehicle surfaces and road textures.
- Status Effects – disable this entirely, as it creates unwanted screen glow in menus.
You can also click on any effect name and adjust its numerical sliders at the bottom of the overlay. However, for most users, simply enabling or disabling effects provides sufficient control.
Troubleshooting Common Issues
ReShade Overlay Does Not Appear When Pressing Home
- Ensure you are pressing the Home key, not the NumPad Home key (if your keyboard has separate navigation keys).
- Run the ReShade setup again and verify you selected the correct rendering API (DirectX 10/11/12).
- Launch the game in windowed or borderless windowed mode instead of exclusive fullscreen.
Game Crashes After Installing ReShade
- Some ReShade effects are performance-intensive. Disable heavy effects such as MXAO (ambient occlusion) or depth-of-field.
- Update your graphics drivers.
- Run the ReShade setup and choose Uninstall ReShade and effects to remove it completely, then reinstall with only basic effects selected.
ReShade Effects Are Too Bright or Overexposed
- Follow Step 9 to disable Bloom, Bloom Lens Flare, and Film Deck.
- Check if the preset includes an effect called Exposure or Tonemap and reduce its intensity using the slider.
Preset Does Not Look Like Screenshots
- Different weather conditions, time of day, and in-game display settings (brightness, contrast, HDR) affect how ReShade looks. Adjust your monitor or in-game brightness settings.
- Ensure you have selected the correct .ini file during Step 7. Re-running the setup and pointing to a different .ini file will replace the effect selection.
Performance Considerations
ReShade adds a post-processing pass to every frame rendered by the game. Depending on the number and complexity of active effects, you may experience a performance impact of 5% to 15% in terms of frames per second. To minimize this:
- Disable effects you do not actively see or enjoy.
- Avoid using multiple anti-aliasing or ambient occlusion shaders simultaneously.
- Test performance in demanding areas of the game (dense forests, city centers with many vehicles) rather than open empty fields.
If your system is already struggling to maintain 60 FPS in Forza Horizon 6, consider using ReShade with only basic effects like vibrance and sharpening, which have minimal performance overhead.
Uninstalling ReShade
If you decide ReShade is not for you, removal is straightforward:
- Run the
ReShade_Setup_6.7.3.exefile again. - Select
Forza Horizon 6.exeas the target game. - When prompted, choose Uninstall ReShade and effects.
- Optionally, delete any
.inipreset files you placed in the game directory.
The original game files remain untouched throughout this process.
ReShade offers Forza Horizon 6 players a free and flexible way to customize the game’s visual identity. Whether you prefer hyperrealistic contrast, vibrant saturation, or a muted cinematic palette, the Nexus Mods community provides a growing library of presets to suit your taste. The installation process requires careful attention to file paths and rendering API selection, but once configured, ReShade runs automatically every time you launch the game.
Remember that visual enhancement is subjective. If the vanilla presentation of Forza Horizon 6 already satisfies you, there is no need to mod. However, for those who enjoy tinkering with post-processing effects, ReShade unlocks a new layer of graphical expression that the base game does not offer.